
Saturday, September 11, 2010
Pugliese // Peter Reinhart
Third batch of pugliese (after the straight-up batch and the mashed-potato batch). Just one loaf. I was out of yeast so I relied entirely on my starter, which I had refreshed yesterday with a bit of rye and a bit of bread flour. Any bit of rye makes the starter happy, and the bread ... well, I'm amazed that you get so much flavor out of just three flours (rye, bread, semolina), water, and salt! The holes this time are more uniform (I slapped the loaf around a bit more) and oven spring was greatly reduced from the last two loaves. Very springy and flavorful.
Tuesday, August 31, 2010
Salsa from the Garden

Inspired or, rather, instructed by textual bulldog, I decided to make chunky salsa with the Early Girl and Better Boy tomatoes in my little strip of garden. The pepper was given to me by another gardener, and boy, is it hot: I touched just the tip of my finger to the tip of my tongue and got a mouthful of fire. I diced just a little bit of the yellow pepper into the salsa. We'll see how spicy it is after it has set a spell.
 |
| Beware the fire! |
Pugliese // Peter Reinhart, The Bread Baker's Apprentice

My quest for hole-y bread made from wet dough continues with this pugliese. The difference between this bread and others I've made is the inclusion of semolina flour in a ratio of about 1/1 with regular (King Arthur) bread flour. I've gotten a little more used to handling wetter dough -- dusting it with flour and giving it quick flips -- and I'm pleased with the results. The loaf pictured above has a more ciabatta-like shape (oblong), whereas the second loaf is closer to square. I slashed one and not the other.
These loaves were baked sequentially on my pizza stone. Reinhart recommends lots of steam in the oven and I did put a pan of water in, but I doubt it had much effect.
The bread itself is soft and has a yellowish color not so evident in the photos. A very nice bread.

Saturday, August 21, 2010
Pretzel Bread // cdiggz on The Fresh Loaf

Recipe is in the comment thread under "Amish Soft Pretzel." I was looking for a new pretzel recipe to try, as I wasn't satisfied with the bagels-in-pretzel-shape that I ended up with a few days ago. I also wanted to try pretzel bread, where you have a pretzel-type sheen, texture and flavor, but in a roll or loaf. (A similar product can be seen at the Two Bites in Suburbia blog.)
Reading around, it seemed clear that the baking soda dip was crucial. I'd tried it in the past, but at that time I was under the impression that the water had to be boiling. This recipe, which was ideal for experimentation because of the low yield, simply calls for hot water in the dip.
Process: Mix ingredients, knead, allow to rise in warm kitchen; cut in two, shape into rough rolls on an oiled board (the dough was too sticky for much handling, despite having added some extra bread flour). Float each roll in the hot soda wash for about thirty seconds (I put each roll in bottom-up, then flipped halfway through the count) and transfer to cookie sheet. Slash an X in the top of each one. Bake for about 20 minutes (I thought maybe longer, but they were a good color already).
I had to let these sit a bit while the oven finished heating, and they spread and rose a bit more -- perhaps the reason that the slashes are so close in color to the crust.
Results: I forgot to sprinkle these with salt or seeds, but even so, they taste much more like pretzel than any bread I've attempted before. The soda wash definitely made a difference. The rolls aren't exactly shiny -- I imagine that I need a moist oven for that -- but there is a deep brown color and, more importantly, a characteristically sharp flavor on the crust, making this my new go-to for pretzel products.

Friday, August 20, 2010
Pretzels from Bagel Recipe // King Arthur Flour Baking Book

I wanted pretzels but I didn't have time to search through the recipes, so I went with the KAF suggestion to use the bagel recipe. Results: chewy like a bagel...but tastes like a bagel, not especially pretzel-y. Will look for something more specific next time.
I put in just a bit of old dough.
Wednesday, August 11, 2010
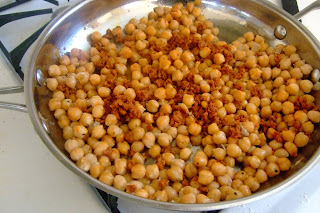
Chickpeas, Soyrizo, Spinach // The Minimalist
Today, a supper recipe.
I prepared a meal of sauteed chickpeas with soyrizo and spinach, slightly adapted from Mark Bittman's recipe at the New York Times in the article "A Dinner Date With India and Spain."
As advertised, very easy, very tasty. I'd like to try it with real chorizo sometime too, for comparison.
One starts by sauteeing the chickpeas until golden and adding the soyrizo ...
then removes the chickpeas and soyrizo, sautees the spinach with the sherry till soft...

adds it all together,

tops with bread crumbs and pops the pan under the broiler to produce a colorful and delicious dish. Highly recommended!
I prepared a meal of sauteed chickpeas with soyrizo and spinach, slightly adapted from Mark Bittman's recipe at the New York Times in the article "A Dinner Date With India and Spain."
As advertised, very easy, very tasty. I'd like to try it with real chorizo sometime too, for comparison.
One starts by sauteeing the chickpeas until golden and adding the soyrizo ...

then removes the chickpeas and soyrizo, sautees the spinach with the sherry till soft...

adds it all together,

tops with bread crumbs and pops the pan under the broiler to produce a colorful and delicious dish. Highly recommended!
Tuesday, July 6, 2010
Pane Francese // King Arthur Flour website
Pane Francese starts from a small piece of old dough and is gradually built up through a series of rises.
My first attempt at realizing this recipe began well -- the dough rose very fast, doubling in considerably less than 8-10 hours for the third rising period. However, once shaped, the dough was sluggish. I'm not sure whether this means that the dough was over-risen before shaping or whether I should have let the loaves stand longer.
This is a wet dough, making the loaves relatively flattish. I shaped into rounds. They ended up fairly dense.
Flavor note: The recipe says that this recipe is only slightly tangy, but my loaves were markedly sour -- no doubt the result of using old sourdough starter as the old dough/chef. I'll try again with the old dough from this recipe.
Friday, April 9, 2010
Doughnut French Toast // Nigella Lawson
I ran across the recipe for Nigella Lawson's Doughnut French Toast yesterday, and couldn't resist giving it a try. A lucky bread mistake made the perfect French toast!
The bread:
I'm a big fan of Peter Reinhart's Wet Dough, Low Knead French Bread from his latest, Artisan Breads Everyday. It's the simplest recipe in terms of time: you mix the flour, water, salt, and a little yeast, give the dough three stretch-and-folds over the course of an hour, pop the bread into the fridge, and then in the morning you just grab a hunk of dough of whatever size, shape it, let it warm up for about an hour, and bake. Great flavor for very little effort, and very reliable.
However, when I made the bread this time I wanted to see if it would rise with a little bit of sourdough starter instead of the usual amount of yeast. I was also out of bread flour, and King Arthur flour, and had to turn to the Trader Joe's "Baker Josef All-Purpose." (I'm not a big fan of this flour; it seems to want to clump.)
I noticed a difference right away in combining the flour and water: unlike my usual shaggy dough, this quickly became a kind of smooth mass, reminiscent of some ciabatta recipes I've tried. It wasn't more wet than usual, but the texture was obviously different.
I also forgot to add the yeast "spike" at the same time as the starter, adding it later, so the bread really did differ from my usual method.
On the day of baking, the bread did show signs of fermentation but was really not up to holding a round shape -- by itself it subsided into a ciabatta shape (slipper-shape, flattish but still rounded at the edges and with a slight dome). The bread was speaking to me, I thought, and reconciled myself to making a ciabatta-style bread.
With that in mind, I underbaked just slightly, aiming for a chewier interior. When cooled and sliced, the interior revealed holes. This was the bread that I used for the French toast.
The toast:
I followed Lawson's recipe with the exceptions that I used low-fat milk and that I replaced the vanilla with bourbon. I oven-dried the slices of bread slightly (at 200) to help with the absorption of the egg mixture, and kept the soak to 2 minutes on either side.
It's a very good fried French toast, and yes, it is somehow reminiscent of a sugar-dredged doughnut. Something about the white bread texture, the taste of frying, and the sugar coating creates that illusion.
I had mine with applesauce; my partner had his with maple syrup.
No leftovers!
Saturday, February 27, 2010
Today's Bread
Today's bread has no title -- it's just a casually constructed sourdough, using the firm starter that was left over after a refresh. I added 1/3 cup of the King Arthur Harvest Grains (soaked in water), about 1 cup KAF White Whole-Wheat, and KAF Bread flour for the rest -- a couple of squeezes of honey, and a couple of tablespoons of KAF Baker's Dry Milk (just to see). A 3-hour rise (or so).

These pictures don't quite show how very dark the crust has become. The cuts were made with the knife held almost horizontal to the top of each loaf (and more cuts seems to work better, as you can see by comparing the first loaf, on the left, with the second, on the right).
I've been painting the loaves with water before sliding them onto the stone and placing an aluminum pan over them for 10-15 minutes at the beginning of the bake -- it's not much!

After cooling, the loaves themselves are soft, not hard (today's a rainy day, too), and there's a faint honey or floral scent.
The Pearl's Walnut Levain (Again) // Maggie Glezer, Artisan Baking
This is my second time making this formula. (I can see, looking at the photo of the previous iteration, that I did not bake the bread long enough -- it's quite pale!) This time, although the finished bread was quite attractive, and tasty, I made a couple of instructive mistakes.


The primary mistake was in not refreshing the firm starter enough times before beginning the bread. Glezer's instructions are explicit: the starter should be refreshed "until it is again quadrupling in volume in 8 hours or less" (Artisan Baking 93). I did refresh it -- once -- but I've been so used to my wet starter, which is reliably enthusiastic, that I didn't take the trouble to check that the firm starter was equally active. Mistake! The dough was very sluggish in both its initial rise and proofing stages, and didn't really increase much even in the oven.
My secondary mistake (and I'm unsure how serious it was) was in forgetting to let the flours, water, and starter autolyze before adding the salt and walnuts. I was so eager to get going that I simply carried on ahead. Et voilà.

(Apologies for the jagged cuts!)
This bread is much darker than my first attempt, and the inside is a richer color. I'm intrigued by the holes because it suggests that I've somehow become better at not degassing the dough -- if I have, I'm not at all sure how I achieved this!
Saturday, February 20, 2010
San Joaquin Sourdough // dmsnyder @ Fresh Loaf
Formula here: San Joaquin Sourdough ("best yet" version).


The diagonal cuts show where I slashed the loaf, and the arc at the top shows where the loaf went ahead and split by itself. (Also, the droopy bits show where I sort of bungled the transfer to the hot stone.)
Here's a picture of the bottom to show how much trouble I have with seams:

The multiple folds tell the story. At least this one did not produce a bread-goiter!
The holes are nice and open (didn't expect to get them), and the flavor is about as close as I've ever gotten to a San Francisco-style sourness. Mm!

This was a particularly interesting bread to make because it was a followup, conceptually, to making the Thom Leonard's Country French -- both use a small portion of rye flour and both use a firm starter (mine is the one described by Maggie Glezer in Artisan Baking). In fact I made a levain based on Thom Leonard's Kalamata Olive Bread instead of strictly following dmsnyder's instructions (though sticking pretty close for the rest).
The bread takes a couple of days. First the levain rises (two days ago), then the bread rises at room temperature (I started mixing it yesterday morning, let it rise till noon or so), and then it ferments in the fridge for about 20 hours (coming out this morning to be shaped).
I continue to have trouble shaping my loaves tightly, which the following picture reveals:

Here's a picture of the bottom to show how much trouble I have with seams:

The multiple folds tell the story. At least this one did not produce a bread-goiter!
The holes are nice and open (didn't expect to get them), and the flavor is about as close as I've ever gotten to a San Francisco-style sourness. Mm!
Tuesday, February 16, 2010
Quick Rustic Ciabatta // LilDice @ Fresh Loaf
[Post backdated to Feb. 8 when the bread was made]
I wanted to try ciabatta again -- it's a challenge to handle a very wet dough and get those big open holes in the final bread. For my quick-and-casual try, I pulled up LilDice's Quick Rustic Ciabatta Pizza dough from the Fresh Loaf site, doubling ingredients as instructed.

While I was making the bread, I got the idea to shift gears and make it into a kind of faux focaccia, so I dimpled slightly on top and brushed it with olive oil when it came out of the oven.
Very tasty!
Continued - Thom Leonard's Country French // Maggie Glezer, Artisan Baking
And here we are. This is a big (4-pound) loaf -- about as big as my baking stone could possibly handle, and definitely bigger than any bread-storage box I own. The speckling on the inside comes from the cereal (see previous post).

I'm proud of those large open holes -- this dough was on the slacker side, and that, plus the size, made it challenging to handle. I'm very pleased that I managed to move from couche to peel, to slash the top, and get it onto the stone without degassing or deforming.
Here's what it looked like out of the oven (it's at least a foot across):

Thom Leonard's Country French // Maggie Glezer, Artisan Baking
Okay, disclosure: I went about this formula so casually that it's hardly fair to put either the original baker's or the author's name on the results. But the Country French was my starting point, and it's a popular bread on the Fresh Loaf Bread Blog, so I'm admitting the inspiration.
My starter this time is Maggie Glezer's firm starter (I usually use a wetter starter and rarely maintain exact proportions). Glezer has you take a rough-grind whole wheat flour and sieve out the bran to make a "high-extraction" flour for the bread, but I didn't have that, so I went with King Arthur's regular white whole wheat and bread flours, plus the small portion of (Bob's) rye that the formula calls for. I also threw in about a cup of Heritage Flakes cereal, so, yes, this is a pretty loose interpretation all around.
As a wild yeast bread, the rise times on this large loaf are pretty heroic -- 8 hours for the "batter-like" levain, 3 hours initial rise, and 4 hours (maybe more) as a proofed loaf in the couche. In an additional departure from the formula, I proofed the loaf in the fridge overnight (had to).
I continue to find that breads made out of Artisan Baking seem somewhat wetter than described, if not a great deal -- this is no doubt due to my having to measure by volume instead of weight. It did make a somewhat wobbly loaf, so I'm hoping that the oven spring will be good. Nice floured pattern on the loaf this morning when I flipped it out of the floured-towel-lined colander I used for proofing.
The peel that my baking friend gave me continues to be essential -- the only other way for me to get such a large loaf onto the stone would've been parchment, or a truly lucky flip.
Results later today.
Tuesday, February 2, 2010
Classic / Stuffed Baguettes // King Arthur Flour
Day 2 of the Classic / Stuffed Baguettes. The starter rose to the top of the bowl, becoming very full of gas:


Then, after a 3-hour rise (with one stretch-and-fold after the first hour), I divided the dough into four pieces (not equal). Two pieces were regular baguettes (that is, I shaped them into baguette-like forms), and two became "stuffed" before proofing:
There were minor bread disasters while loading: I managed to flip both of the "standard" baguettes onto their slit-sides, so they assumed especially rustic shapes. One of the baguettes came unsealed and assumed a fan shape. You can see from the results photo that each loaf had its own character.
 From left to right, then: baguette-that-came-unsealed; standard baguette, stuffed baguette 1, stuffed baguette 2.
I'll try this recipe again, and the stuffed version was definitely popular.


Then, after a 3-hour rise (with one stretch-and-fold after the first hour), I divided the dough into four pieces (not equal). Two pieces were regular baguettes (that is, I shaped them into baguette-like forms), and two became "stuffed" before proofing:
Flatten each piece into a 5" square. Layer with the stuffing of your choice—a slice or two of ham or salami, some cheese, mustard—and roll up like a jelly roll, pinching the ends and the side seam closed.For stuffing, I used smoked cheddar and spicy mustard, with a little sprinkling of shredded romano/parmesan blend. When sliced, the cheesy pockets make lovely pinwheels. I'm sorry I can't show you images but both were eaten at Movie Night!
There were minor bread disasters while loading: I managed to flip both of the "standard" baguettes onto their slit-sides, so they assumed especially rustic shapes. One of the baguettes came unsealed and assumed a fan shape. You can see from the results photo that each loaf had its own character.

I'll try this recipe again, and the stuffed version was definitely popular.
Sunday, January 31, 2010
Classic Baguettes - Starter // King Arthur Flour
I wanted to do something with the "European-Style" flour that I bought recently from King Arthur Flour, so I've stirred together the starter for this Classic Baguette recipe:
Starter
1/2 cup (4 ounces) cool water
1 cup (4 1/4 ounces) King Arthur Unbleached All-Purpose Flour or Unbleached Bread Flour
1/16 teaspoon instant yeast
It makes a soft dough; now it needs to stand for approx. 14 hours.
I haven't made up my mind yet whether these will be "stuffed" baguettes or the ordinary kind. --Of course, my baguette-shaping skills are pretty rudimentary, so achieving a strong "ordinary" would be an achievement for me!
Sunday, January 24, 2010


English Muffins // Peter Reinhart

This was my first attempt to make English muffins using crumpet rings. The recipe calls for making a stretchy overnight sponge, then stirring in a dissolved baking soda mixture to further activate the dough/batter. The crumpet rings are placed on a flat skillet and heated, then spritzed with oil and dusted with cornmeal. The batter goes into the rings and "bakes" on one side for 12-15 minutes, then the muffins are flipped and "baked" some more. They finish by cooling (the recipe says to cool for at least 30 minutes before eating -- these are not quick morning treats unless you bake ahead and toast in the morning!).
I found that the interior stayed somewhat doughy, so I might try a longer baking time on each side next time. They do have a creamy texture -- almost eggy, even though the sponge gets its richness from milk only.

And nom.
Subscribe to:
Comments (Atom)