
I ran across the recipe for Nigella Lawson's Doughnut French Toast yesterday, and couldn't resist giving it a try. A lucky bread mistake made the perfect French toast!
The bread:
I'm a big fan of Peter Reinhart's Wet Dough, Low Knead French Bread from his latest, Artisan Breads Everyday. It's the simplest recipe in terms of time: you mix the flour, water, salt, and a little yeast, give the dough three stretch-and-folds over the course of an hour, pop the bread into the fridge, and then in the morning you just grab a hunk of dough of whatever size, shape it, let it warm up for about an hour, and bake. Great flavor for very little effort, and very reliable.
However, when I made the bread this time I wanted to see if it would rise with a little bit of sourdough starter instead of the usual amount of yeast. I was also out of bread flour, and King Arthur flour, and had to turn to the Trader Joe's "Baker Josef All-Purpose." (I'm not a big fan of this flour; it seems to want to clump.)
I noticed a difference right away in combining the flour and water: unlike my usual shaggy dough, this quickly became a kind of smooth mass, reminiscent of some ciabatta recipes I've tried. It wasn't more wet than usual, but the texture was obviously different.
I also forgot to add the yeast "spike" at the same time as the starter, adding it later, so the bread really did differ from my usual method.
On the day of baking, the bread did show signs of fermentation but was really not up to holding a round shape -- by itself it subsided into a ciabatta shape (slipper-shape, flattish but still rounded at the edges and with a slight dome). The bread was speaking to me, I thought, and reconciled myself to making a ciabatta-style bread.
With that in mind, I underbaked just slightly, aiming for a chewier interior. When cooled and sliced, the interior revealed holes. This was the bread that I used for the French toast.
The toast:
I followed Lawson's recipe with the exceptions that I used low-fat milk and that I replaced the vanilla with bourbon. I oven-dried the slices of bread slightly (at 200) to help with the absorption of the egg mixture, and kept the soak to 2 minutes on either side.
It's a very good fried French toast, and yes, it is somehow reminiscent of a sugar-dredged doughnut. Something about the white bread texture, the taste of frying, and the sugar coating creates that illusion.
I had mine with applesauce; my partner had his with maple syrup.
No leftovers!
Friday, April 9, 2010


Saturday, February 27, 2010
Today's Bread
Today's bread has no title -- it's just a casually constructed sourdough, using the firm starter that was left over after a refresh. I added 1/3 cup of the King Arthur Harvest Grains (soaked in water), about 1 cup KAF White Whole-Wheat, and KAF Bread flour for the rest -- a couple of squeezes of honey, and a couple of tablespoons of KAF Baker's Dry Milk (just to see). A 3-hour rise (or so).

These pictures don't quite show how very dark the crust has become. The cuts were made with the knife held almost horizontal to the top of each loaf (and more cuts seems to work better, as you can see by comparing the first loaf, on the left, with the second, on the right).
I've been painting the loaves with water before sliding them onto the stone and placing an aluminum pan over them for 10-15 minutes at the beginning of the bake -- it's not much!

After cooling, the loaves themselves are soft, not hard (today's a rainy day, too), and there's a faint honey or floral scent.

These pictures don't quite show how very dark the crust has become. The cuts were made with the knife held almost horizontal to the top of each loaf (and more cuts seems to work better, as you can see by comparing the first loaf, on the left, with the second, on the right).
I've been painting the loaves with water before sliding them onto the stone and placing an aluminum pan over them for 10-15 minutes at the beginning of the bake -- it's not much!

After cooling, the loaves themselves are soft, not hard (today's a rainy day, too), and there's a faint honey or floral scent.
The Pearl's Walnut Levain (Again) // Maggie Glezer, Artisan Baking
This is my second time making this formula. (I can see, looking at the photo of the previous iteration, that I did not bake the bread long enough -- it's quite pale!) This time, although the finished bread was quite attractive, and tasty, I made a couple of instructive mistakes.


The primary mistake was in not refreshing the firm starter enough times before beginning the bread. Glezer's instructions are explicit: the starter should be refreshed "until it is again quadrupling in volume in 8 hours or less" (Artisan Baking 93). I did refresh it -- once -- but I've been so used to my wet starter, which is reliably enthusiastic, that I didn't take the trouble to check that the firm starter was equally active. Mistake! The dough was very sluggish in both its initial rise and proofing stages, and didn't really increase much even in the oven.
My secondary mistake (and I'm unsure how serious it was) was in forgetting to let the flours, water, and starter autolyze before adding the salt and walnuts. I was so eager to get going that I simply carried on ahead. Et voilà.

(Apologies for the jagged cuts!)
This bread is much darker than my first attempt, and the inside is a richer color. I'm intrigued by the holes because it suggests that I've somehow become better at not degassing the dough -- if I have, I'm not at all sure how I achieved this!
Saturday, February 20, 2010
San Joaquin Sourdough // dmsnyder @ Fresh Loaf
Formula here: San Joaquin Sourdough ("best yet" version).


The diagonal cuts show where I slashed the loaf, and the arc at the top shows where the loaf went ahead and split by itself. (Also, the droopy bits show where I sort of bungled the transfer to the hot stone.)
Here's a picture of the bottom to show how much trouble I have with seams:

The multiple folds tell the story. At least this one did not produce a bread-goiter!
The holes are nice and open (didn't expect to get them), and the flavor is about as close as I've ever gotten to a San Francisco-style sourness. Mm!

This was a particularly interesting bread to make because it was a followup, conceptually, to making the Thom Leonard's Country French -- both use a small portion of rye flour and both use a firm starter (mine is the one described by Maggie Glezer in Artisan Baking). In fact I made a levain based on Thom Leonard's Kalamata Olive Bread instead of strictly following dmsnyder's instructions (though sticking pretty close for the rest).
The bread takes a couple of days. First the levain rises (two days ago), then the bread rises at room temperature (I started mixing it yesterday morning, let it rise till noon or so), and then it ferments in the fridge for about 20 hours (coming out this morning to be shaped).
I continue to have trouble shaping my loaves tightly, which the following picture reveals:

Here's a picture of the bottom to show how much trouble I have with seams:

The multiple folds tell the story. At least this one did not produce a bread-goiter!
The holes are nice and open (didn't expect to get them), and the flavor is about as close as I've ever gotten to a San Francisco-style sourness. Mm!
Tuesday, February 16, 2010
Quick Rustic Ciabatta // LilDice @ Fresh Loaf
[Post backdated to Feb. 8 when the bread was made]
I wanted to try ciabatta again -- it's a challenge to handle a very wet dough and get those big open holes in the final bread. For my quick-and-casual try, I pulled up LilDice's Quick Rustic Ciabatta Pizza dough from the Fresh Loaf site, doubling ingredients as instructed.

While I was making the bread, I got the idea to shift gears and make it into a kind of faux focaccia, so I dimpled slightly on top and brushed it with olive oil when it came out of the oven.
Very tasty!
I wanted to try ciabatta again -- it's a challenge to handle a very wet dough and get those big open holes in the final bread. For my quick-and-casual try, I pulled up LilDice's Quick Rustic Ciabatta Pizza dough from the Fresh Loaf site, doubling ingredients as instructed.

While I was making the bread, I got the idea to shift gears and make it into a kind of faux focaccia, so I dimpled slightly on top and brushed it with olive oil when it came out of the oven.
Very tasty!
Continued - Thom Leonard's Country French // Maggie Glezer, Artisan Baking
And here we are. This is a big (4-pound) loaf -- about as big as my baking stone could possibly handle, and definitely bigger than any bread-storage box I own. The speckling on the inside comes from the cereal (see previous post).

I'm proud of those large open holes -- this dough was on the slacker side, and that, plus the size, made it challenging to handle. I'm very pleased that I managed to move from couche to peel, to slash the top, and get it onto the stone without degassing or deforming.
Here's what it looked like out of the oven (it's at least a foot across):


I'm proud of those large open holes -- this dough was on the slacker side, and that, plus the size, made it challenging to handle. I'm very pleased that I managed to move from couche to peel, to slash the top, and get it onto the stone without degassing or deforming.
Here's what it looked like out of the oven (it's at least a foot across):

Thom Leonard's Country French // Maggie Glezer, Artisan Baking
Okay, disclosure: I went about this formula so casually that it's hardly fair to put either the original baker's or the author's name on the results. But the Country French was my starting point, and it's a popular bread on the Fresh Loaf Bread Blog, so I'm admitting the inspiration.
My starter this time is Maggie Glezer's firm starter (I usually use a wetter starter and rarely maintain exact proportions). Glezer has you take a rough-grind whole wheat flour and sieve out the bran to make a "high-extraction" flour for the bread, but I didn't have that, so I went with King Arthur's regular white whole wheat and bread flours, plus the small portion of (Bob's) rye that the formula calls for. I also threw in about a cup of Heritage Flakes cereal, so, yes, this is a pretty loose interpretation all around.
As a wild yeast bread, the rise times on this large loaf are pretty heroic -- 8 hours for the "batter-like" levain, 3 hours initial rise, and 4 hours (maybe more) as a proofed loaf in the couche. In an additional departure from the formula, I proofed the loaf in the fridge overnight (had to).
I continue to find that breads made out of Artisan Baking seem somewhat wetter than described, if not a great deal -- this is no doubt due to my having to measure by volume instead of weight. It did make a somewhat wobbly loaf, so I'm hoping that the oven spring will be good. Nice floured pattern on the loaf this morning when I flipped it out of the floured-towel-lined colander I used for proofing.
The peel that my baking friend gave me continues to be essential -- the only other way for me to get such a large loaf onto the stone would've been parchment, or a truly lucky flip.
Results later today.
My starter this time is Maggie Glezer's firm starter (I usually use a wetter starter and rarely maintain exact proportions). Glezer has you take a rough-grind whole wheat flour and sieve out the bran to make a "high-extraction" flour for the bread, but I didn't have that, so I went with King Arthur's regular white whole wheat and bread flours, plus the small portion of (Bob's) rye that the formula calls for. I also threw in about a cup of Heritage Flakes cereal, so, yes, this is a pretty loose interpretation all around.
As a wild yeast bread, the rise times on this large loaf are pretty heroic -- 8 hours for the "batter-like" levain, 3 hours initial rise, and 4 hours (maybe more) as a proofed loaf in the couche. In an additional departure from the formula, I proofed the loaf in the fridge overnight (had to).
I continue to find that breads made out of Artisan Baking seem somewhat wetter than described, if not a great deal -- this is no doubt due to my having to measure by volume instead of weight. It did make a somewhat wobbly loaf, so I'm hoping that the oven spring will be good. Nice floured pattern on the loaf this morning when I flipped it out of the floured-towel-lined colander I used for proofing.
The peel that my baking friend gave me continues to be essential -- the only other way for me to get such a large loaf onto the stone would've been parchment, or a truly lucky flip.
Results later today.
Tuesday, February 2, 2010
Classic / Stuffed Baguettes // King Arthur Flour
Day 2 of the Classic / Stuffed Baguettes. The starter rose to the top of the bowl, becoming very full of gas:


Then, after a 3-hour rise (with one stretch-and-fold after the first hour), I divided the dough into four pieces (not equal). Two pieces were regular baguettes (that is, I shaped them into baguette-like forms), and two became "stuffed" before proofing:
There were minor bread disasters while loading: I managed to flip both of the "standard" baguettes onto their slit-sides, so they assumed especially rustic shapes. One of the baguettes came unsealed and assumed a fan shape. You can see from the results photo that each loaf had its own character.
 From left to right, then: baguette-that-came-unsealed; standard baguette, stuffed baguette 1, stuffed baguette 2.
I'll try this recipe again, and the stuffed version was definitely popular.


Then, after a 3-hour rise (with one stretch-and-fold after the first hour), I divided the dough into four pieces (not equal). Two pieces were regular baguettes (that is, I shaped them into baguette-like forms), and two became "stuffed" before proofing:
Flatten each piece into a 5" square. Layer with the stuffing of your choice—a slice or two of ham or salami, some cheese, mustard—and roll up like a jelly roll, pinching the ends and the side seam closed.For stuffing, I used smoked cheddar and spicy mustard, with a little sprinkling of shredded romano/parmesan blend. When sliced, the cheesy pockets make lovely pinwheels. I'm sorry I can't show you images but both were eaten at Movie Night!
There were minor bread disasters while loading: I managed to flip both of the "standard" baguettes onto their slit-sides, so they assumed especially rustic shapes. One of the baguettes came unsealed and assumed a fan shape. You can see from the results photo that each loaf had its own character.

I'll try this recipe again, and the stuffed version was definitely popular.
Sunday, January 31, 2010
Classic Baguettes - Starter // King Arthur Flour
I wanted to do something with the "European-Style" flour that I bought recently from King Arthur Flour, so I've stirred together the starter for this Classic Baguette recipe:
Starter
1/2 cup (4 ounces) cool water
1 cup (4 1/4 ounces) King Arthur Unbleached All-Purpose Flour or Unbleached Bread Flour
1/16 teaspoon instant yeast
It makes a soft dough; now it needs to stand for approx. 14 hours.
I haven't made up my mind yet whether these will be "stuffed" baguettes or the ordinary kind. --Of course, my baguette-shaping skills are pretty rudimentary, so achieving a strong "ordinary" would be an achievement for me!
Starter
1/2 cup (4 ounces) cool water
1 cup (4 1/4 ounces) King Arthur Unbleached All-Purpose Flour or Unbleached Bread Flour
1/16 teaspoon instant yeast
It makes a soft dough; now it needs to stand for approx. 14 hours.
I haven't made up my mind yet whether these will be "stuffed" baguettes or the ordinary kind. --Of course, my baguette-shaping skills are pretty rudimentary, so achieving a strong "ordinary" would be an achievement for me!
Sunday, January 24, 2010


English Muffins // Peter Reinhart

This was my first attempt to make English muffins using crumpet rings. The recipe calls for making a stretchy overnight sponge, then stirring in a dissolved baking soda mixture to further activate the dough/batter. The crumpet rings are placed on a flat skillet and heated, then spritzed with oil and dusted with cornmeal. The batter goes into the rings and "bakes" on one side for 12-15 minutes, then the muffins are flipped and "baked" some more. They finish by cooling (the recipe says to cool for at least 30 minutes before eating -- these are not quick morning treats unless you bake ahead and toast in the morning!).
I found that the interior stayed somewhat doughy, so I might try a longer baking time on each side next time. They do have a creamy texture -- almost eggy, even though the sponge gets its richness from milk only.

And nom.
Monday, November 9, 2009
In-Progress: Sourdough
I often throw together a sourdough bread that's loosely based on the King Arthur Flour recipe for Pain au levain (in The King Arthur Flour All-Purpose book). Sometimes I don't even measure -- I just put the larger portion of my fed starter into the bowl and add flour and water to consistency. I aim for a slightly tacky dough, as I've learned that the dough will firm up during stretch-and-fold operations.
Right now I'm making this bread with the following:
my starter, which was fed this morning with white-wheat flour (KAF)
half a cup of golden flax seeds
half a cup of Silver Palate's "thick and rough" oatmeal cereal
Trader Joe's "Baker Josef" AP flour
tap water
salt
Some hasty notes on what's in-progress here:
I start by adding water to the starter, which is about two cups' worth. Then I add the flax seeds and oatmeal as I'd like them to soak up some of the water (a better way, possibly, would be to soak the seeds and oatmeal overnight). After letting it all stand for a little, I mix in the flour and wait 20 minutes.
After twenty minutes, I mix in the salt. I've learned that the dough should taste slightly salty at this point: after rising, it won't.
Another twenty minutes, stretch and fold; twenty minutes, stretch and fold, then into the refrigerator. I've learned from Peter Reinhart that the cold fermentation can improve flavor -- and it's convenient, at least. I've learned from Maggie Glezer that you can do the stretch and fold step on the kneading board (sprinkle a little flour on the board and in the bowl, turn out, gently flatten into a rectangle, and fold, left, top, right, bottom: makes a package).
In the morning, I'll cut off some dough, shape it, and let it warm up for about an hour. My shaping skills aren't strong enough for a long proof: I depend on the extra expansion in the oven. I'll sprinkle the loaf with hot water, slash it (still working on those cuts from the side, rather than straight up and down), and bake. Results here tomorrow!
Right now I'm making this bread with the following:
my starter, which was fed this morning with white-wheat flour (KAF)
half a cup of golden flax seeds
half a cup of Silver Palate's "thick and rough" oatmeal cereal
Trader Joe's "Baker Josef" AP flour
tap water
salt
Some hasty notes on what's in-progress here:
I start by adding water to the starter, which is about two cups' worth. Then I add the flax seeds and oatmeal as I'd like them to soak up some of the water (a better way, possibly, would be to soak the seeds and oatmeal overnight). After letting it all stand for a little, I mix in the flour and wait 20 minutes.
After twenty minutes, I mix in the salt. I've learned that the dough should taste slightly salty at this point: after rising, it won't.
Another twenty minutes, stretch and fold; twenty minutes, stretch and fold, then into the refrigerator. I've learned from Peter Reinhart that the cold fermentation can improve flavor -- and it's convenient, at least. I've learned from Maggie Glezer that you can do the stretch and fold step on the kneading board (sprinkle a little flour on the board and in the bowl, turn out, gently flatten into a rectangle, and fold, left, top, right, bottom: makes a package).
In the morning, I'll cut off some dough, shape it, and let it warm up for about an hour. My shaping skills aren't strong enough for a long proof: I depend on the extra expansion in the oven. I'll sprinkle the loaf with hot water, slash it (still working on those cuts from the side, rather than straight up and down), and bake. Results here tomorrow!
Sunday, October 25, 2009
Sourdough Ciabatta with Caramelized Onions & Herbs / adapted from Poolish Ciabatta // Peter Reinhart, The Bread Maker's Apprentice

I'd like to focus on ciabatta for a while. I have yet to achieve the "airy" quality deriving from big interior holes in this bread, and no doubt my handling of the dough is partly responsible. Luckily it's tasty even if not correct.
This bread was an adaptation of Peter Reinhart's poolish-method ciabatta, using my sourdough starter. I fed the starter and increased the hydration to something like a poolish consistency, and then I simply replaced the poolish quantity with the starter and omitted the commercial yeast. My starter had been fed with both a rye blend and bread flours from King Arthur.
All of the commentators on ciabatta agree: this dough has to be wet, as wet as you can make it. I used milk and water and gave it a go in the stand mixer, then took it through several stretch-and-folds on a bed of flour. I picked up the trick from another cookbook of doing this stage in a casserole dish (it holds the wet dough and the bed of flour pretty well). I gather from some breadmaking sources that you actually want to use a softer flour for ciabatta, but I have yet to test this out.
I also used the option in The Bread Maker's Apprentice of caramelizing some onions and adding some herbs (tarragon), which are all added to the dough during stretch-and-fold operations. The final rise is on floured cloth. The bread (which was definitely puffy -- perhaps it deflated in the transfer to the oven?) is baked on parchment, on a hot stone.
Seeded Pain au Levain // The King Arthur Flour Baker's Companion

Just ordinary pain au levain, rolled in an aromatic seed mix from King Arthur Flour.
Multigrain Extraordinare // Peter Reinhart, The Bread Maker's Apprentice

This recipe calls for a grain starter containing oatmeal, cornmeal, buckwheat. It also takes some cooked rice. In this picture you can see the center swirl that comes from rolling the loaf up out of a flattened rectangle. Cooked in a bread pan. It's a sweeter bread with some brown sugar.
Thursday, October 8, 2009
Crackerbreads // The King Arthur Flour Book
Lately I've taken a break from yeasted breads and tried the techniques of stone-baked flat breads. The following are "Many-Seeded Crackerbread" and "Carta di Musica," respectively.

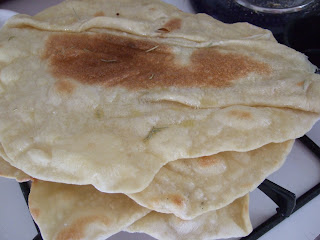

Both breads are baked on a hot stone. Here's the seeded bread:


The upper picture is of a crackerbread that's meant to have a lot of seeds in it -- I used the King Arthur bagel topping, which includes bits of onion.
The lower picture is of a crackerbread that's brushed with olive oil and sprinkled with rosemary after it's removed from the oven.
The fun thing about the Carta di Musica is that it contains semolina flour and can, after resting, be rolled out and handled/stretched like a thin crust pizza:

Both breads are baked on a hot stone. Here's the seeded bread:

On Deformed Baguettes
The authorities all say that shaping a good baguette (or even a demi-baguette) takes practice. Indeed, Maggie Glezer even suggests that the professionals can get rusty without practice. I usually content myself with whatever lumpy shape makes it onto the stone, but lately I've made a couple of more conscientious attempts at baguette. The following are the (revealing) results: breads that look like they've exploded out the side, or grown goiters.


The reason for the goiter, of course, is a failure to seal the bottom edge of the bread adequately. The shaping of loaves is supposed to create a taut, smooth surface or "skin" that can help to seal the bread. In shaping a baguette, the baker takes the bread through at least two letter-fold sequences (see Peter Reinhart, The Bread Maker's Apprentice, for pictures).
I've struggled with the sealing-the-edge technique, described as sealing the bread with the heel or the edge of your hand. My dough often seems reluctant to seal, whether due to overworking (should I let it rest, then come back and pinch it again?) or to picked-up flour from the board.
In the meantime, humorous results (this one was more of a batard anyway).

Thursday, September 24, 2009
In Brief: The Pearl's Walnut Levain // Maggie Glezer, Artisan Baking
This bread is quite similar to The Pearl's Pane coi santi, as it uses a similar French-style levain method to produce a sourdough bread. The proportions, however, are a little different. My walnut bread was a little more successful than my Pane coi santi.

This makes a good French toast (assuming a richer egg soak).

This makes a good French toast (assuming a richer egg soak).
Pane Siciliano // Peter Reinhart, The Bread Baker's Apprentice
Peter Reinhart's Pane Siciliano is a favorite of mine because of the texture imparted by the semolina flour. It also has (is intended to have) a nifty S-curve (but, as you can see, Mistakes Were Made). It utilizes a preferment that has to be made in advance (ideally, a day in advance, but in this case it just got some extra rise time).

Part 1: Pâté Fermentée
This baking round confirms my observation about the differences between bread books: whereas my flour measurements for Glezer's formulas have come up light (leading to dough wetter than described), my measurements for Reinhart's pate fermentee came up heavy (drier than described). Proof again, if you needed it, that weighing is more accurate than scooping. But I still don't own a reliable scale.
I'm trying to minimize the time that I work the dough, as Glezer says mixing too much will aerate the dough and bleach the flours, resulting in a loss of flavor. This means adding an autolyse stage to my bread mixing (letting the dough rest after it comes together and before turning/making smooth). I'm doing this part by feel.

The PF rose quite briskly, as it's been hot weather in Southern California. I'd almost be inclined to reduce the yeast in this and the main dough -- in the picture, it's barely at the halfway counter by the clock.
Part 2: Main Dough
Mixing/Fermentation. This dough contains equal parts bread and semolina flour, plus the PF and small amounts of honey and oil. I added the oil after the rest of the dough was mixed and relaxed, as I've heard oil can interfere with gluten formation (however, I doubt whether a couple of tablespoons is that significant -- this is more important for brioche, I gather). It took some time for the oil to absorb.
The first rise was quite robust, even though I cut the rising time short; when I went to shape the dough, I found it bounding out of the bowl (honeycombing).
I made three loaves -- one quite lovely, the others ugly ducklings. Purists will note that the skin is not nearly tight enough! Bread does not suit a hurried soul!

Proofing. This bread proofs in the fridge overnight. The loaves were nearly ready to go when I pulled them out this morning. However, in the process of loading the breads into the oven, I suffered a terrible Bread Disaster (tm) -- I somehow misaligned the baking sheet as it was going onto the rack, and the sheet flipped a quarter turn and wedged between the door and the shelves. (I'm still not sure exactly how this happened.) With tiny screams of anxiety I scooped each loaf up and plopped it back onto the sheet -- hoping that there was some air left in the mangled loaves. There was a visible dough print left on the oven door!
Results. The bread, as you can see, turned into a kind of lumpy superloaf where the three original loaves got squished together in the rescue operation. The places where each loaf hit the oven door are visible if you know where to look. The interior of each loaf is dense and spongy -- this really was a super-rising bread -- and, of course, completely irregular, due to the accident. But edible! (After snapping the "results" picture, I returned the bread to the oven for approximately 10 minutes.)

Part 1: Pâté Fermentée
This baking round confirms my observation about the differences between bread books: whereas my flour measurements for Glezer's formulas have come up light (leading to dough wetter than described), my measurements for Reinhart's pate fermentee came up heavy (drier than described). Proof again, if you needed it, that weighing is more accurate than scooping. But I still don't own a reliable scale.
I'm trying to minimize the time that I work the dough, as Glezer says mixing too much will aerate the dough and bleach the flours, resulting in a loss of flavor. This means adding an autolyse stage to my bread mixing (letting the dough rest after it comes together and before turning/making smooth). I'm doing this part by feel.

The PF rose quite briskly, as it's been hot weather in Southern California. I'd almost be inclined to reduce the yeast in this and the main dough -- in the picture, it's barely at the halfway counter by the clock.
Part 2: Main Dough
Mixing/Fermentation. This dough contains equal parts bread and semolina flour, plus the PF and small amounts of honey and oil. I added the oil after the rest of the dough was mixed and relaxed, as I've heard oil can interfere with gluten formation (however, I doubt whether a couple of tablespoons is that significant -- this is more important for brioche, I gather). It took some time for the oil to absorb.
The first rise was quite robust, even though I cut the rising time short; when I went to shape the dough, I found it bounding out of the bowl (honeycombing).
I made three loaves -- one quite lovely, the others ugly ducklings. Purists will note that the skin is not nearly tight enough! Bread does not suit a hurried soul!

Proofing. This bread proofs in the fridge overnight. The loaves were nearly ready to go when I pulled them out this morning. However, in the process of loading the breads into the oven, I suffered a terrible Bread Disaster (tm) -- I somehow misaligned the baking sheet as it was going onto the rack, and the sheet flipped a quarter turn and wedged between the door and the shelves. (I'm still not sure exactly how this happened.) With tiny screams of anxiety I scooped each loaf up and plopped it back onto the sheet -- hoping that there was some air left in the mangled loaves. There was a visible dough print left on the oven door!
Results. The bread, as you can see, turned into a kind of lumpy superloaf where the three original loaves got squished together in the rescue operation. The places where each loaf hit the oven door are visible if you know where to look. The interior of each loaf is dense and spongy -- this really was a super-rising bread -- and, of course, completely irregular, due to the accident. But edible! (After snapping the "results" picture, I returned the bread to the oven for approximately 10 minutes.)
Sunday, September 13, 2009
The Pearl's Pane coi santi // Maggie Glezer, Artisan Baking

This bread is marked as Advanced in the Artisan Baking book, and the chief reason seems to be the difficulty of kneading in by hand a huge quantity of walnuts and raisins, not a few of which wanted to pop out and roll across the counter. This bread takes the full day to make, plus the preparation of the starter and levain the day before.

Ingredient Notes:
KAF All-Purpose
KAF White Wheat Flour
KAF Rye Blend Flour
Preparation: This recipe calls for levain, which is made the day before from a starter that has been refreshed within 8 hours. Here's my levain going down for the night:

The flours are mixed with water and left to autolyse. After adding the salt and levain and mixing with the dough hook, I had a very wet dough, not the firm dry dough called for in the recipe. This is the second recipe from this book that has turned out fairly wet, so I'm guessing there's a mismatch between the measuring cups I have and the book measurements. I don't have an accurate scale, so we'll be measuring more generously from now on.

A tablespoon of bread flour, plus additional flour during the hand-kneading stage, got it a bit firmer. After mixing in the walnuts and raisins (this took some rests for the dough to relax further), the dough went down for an hour, was turned, and back in the bowl for another 3-4 hours. Here it is before the rise:

After that, it was cut in two, shaped into batards (one shaped by rolling and pinching, the other in the traditional letter-fold way) and left to rest on a floured cloth (couche):

...for another 3 hours. The breads became puffy but not huge. (In the picture above, you can already see that the walnuts are staining the dough with dark swirls.)
The breads were then placed on parchment paper, shallowly cut, and slid onto a baking stone, 425 in my gas oven. And the result:

Results: With so many raisins and such a long rise, the bread can't help but taste sweet. The small quantities of rye and whole wheat definitely deepen the flavor and make it more complex. The bread is chewy.
I checked website for the Pearl Bakery (whose bread inspired Glezer's recipe), and note that their version of pane coi santi includes black pepper -- something to keep in mind for my next go at this bread.
Friday, September 11, 2009
In Progress: Sourdough Starter // Maggie Glezer
I'm currently refreshing my starter into the very firm, dough-like starter preferred by Maggie Glezer in Artisan Baking. Here's what it looks like as of this afternoon:


No, that's not a small underbaked biscuit -- this starter is very firm!
KAF Lemon-Almond Biscotti
We were running out of the Nonni's biscotti and I thought it might be time to try my hand again. However, the Old-Fashioned Biscotti recipe in The King Arthur Baker's Companion calls for three eggs, and we were down to two, so I pulled up this Lemon-Almond Biscotti recipe from the website. They've already blogged it on their Baker's Banter site (We break for biscotti, 30 Apr. 2008), so check out the page for step-by-step pictures (including a mister that looks a little like a blowtorch) and baker comments.

Ingredients:
Flour: KAF All-Purpose
Sugar: C&H Superfine
Almond extract: Beck's Secret Spoon Pure
Preparation: My own necessary adjustments to the recipe include using prepared dried lemon peel (1:1, according to the label) and (gasp) prepared lemon juice. I was also a little short on almond extract and couldn't go all the way up to the maximum amount, as I wanted to.
The recipe produces a soft dough very similar to unchilled cookie dough (which I guess this more or less is). Using parchment paper helps as you don't have to worry about the dough sticking to the sheet. The trickiest stage is coaxing the dough into a flattened "log" of the right length and thickness. I found that wetting the spatula repeatedly helped the most (good and wet, not just damp). What you end up with will look squarish and cook out into a rounded hump similar to the Baker's Banter picture, so you will have those nice round edges that you've seen on all commercial biscotti.
After taking the biscotti out of the oven after the first bake, I left them to cool for about an hour. I found it unnecessary to mist the log as the recipe suggests -- just go slowly with the serrated knife and, if the dough is cool enough to hold together, you won't have more than a few crumbles. I sliced at a slight diagonal to get longer slices.
The final stage is the "toasting" stage, which dries out the cookies and produces a nice brown edge. You can adjust the second bake according to the thickness of the slices and the desired amount of browning.
Results: After initial cooling, the cookies seem quite dry and crisp. I imagine that they will soften slightly over time, producing the "light and crunchy" cookies that the Banter page describes as "made for eating out of hand."

Ingredients:
Flour: KAF All-Purpose
Sugar: C&H Superfine
Almond extract: Beck's Secret Spoon Pure
Preparation: My own necessary adjustments to the recipe include using prepared dried lemon peel (1:1, according to the label) and (gasp) prepared lemon juice. I was also a little short on almond extract and couldn't go all the way up to the maximum amount, as I wanted to.
The recipe produces a soft dough very similar to unchilled cookie dough (which I guess this more or less is). Using parchment paper helps as you don't have to worry about the dough sticking to the sheet. The trickiest stage is coaxing the dough into a flattened "log" of the right length and thickness. I found that wetting the spatula repeatedly helped the most (good and wet, not just damp). What you end up with will look squarish and cook out into a rounded hump similar to the Baker's Banter picture, so you will have those nice round edges that you've seen on all commercial biscotti.
After taking the biscotti out of the oven after the first bake, I left them to cool for about an hour. I found it unnecessary to mist the log as the recipe suggests -- just go slowly with the serrated knife and, if the dough is cool enough to hold together, you won't have more than a few crumbles. I sliced at a slight diagonal to get longer slices.
The final stage is the "toasting" stage, which dries out the cookies and produces a nice brown edge. You can adjust the second bake according to the thickness of the slices and the desired amount of browning.
Results: After initial cooling, the cookies seem quite dry and crisp. I imagine that they will soften slightly over time, producing the "light and crunchy" cookies that the Banter page describes as "made for eating out of hand."
Monday, August 24, 2009
Bee Sting Cake (w/ J.N.) // Nick Malgieri, Perfect Cakes
A brioche-cake base with cream filling and a candied almond topping. J.N.'s been wanting to make this for a while, but the brioche, as a yeasted product, made him nervous (past yeasts have failed him). We collaborated and produced a rich dessert.

Ingredients:
Sage blossom honey
T.J.'s AP Flour
Superfine sugar
Preparation: We started by making the sweet brioche, which is pressed into the bottom of the springform and pricked with a fork. Then we made the almond candy topping, which cools briefly before being added to the risen cake and baked, and the cream filling, which must chill in the fridge. Each step is relatively simple, but as there are three components, it is a time-consuming process.
We found that the candy layer had become quite stiff by the time we needed to spread it on the cake -- it was almost stiff enough to roll out, but we coaxed and poked it. Probably the candy wasn't supposed to be this hard; we heated it at such a low temperature that it didn't want to boil for a long time. When the cake came out of the oven, the denser sections of candy had sunk quite deeply into the cake (more of a cosmetic issue than anything).
Assembly: J.N. cut the cooled cake with a serrated knife, spread on the chilled cream, and added the top layer, which had been sliced into eight wedges.

Results: The source of the "bee sting" label is obvious, as the almond candy layer has a pronounced and very delicious honey flavor.This is quite a rich coffee cake and makes a great breakfast treat.

Ingredients:
Sage blossom honey
T.J.'s AP Flour
Superfine sugar
Preparation: We started by making the sweet brioche, which is pressed into the bottom of the springform and pricked with a fork. Then we made the almond candy topping, which cools briefly before being added to the risen cake and baked, and the cream filling, which must chill in the fridge. Each step is relatively simple, but as there are three components, it is a time-consuming process.
We found that the candy layer had become quite stiff by the time we needed to spread it on the cake -- it was almost stiff enough to roll out, but we coaxed and poked it. Probably the candy wasn't supposed to be this hard; we heated it at such a low temperature that it didn't want to boil for a long time. When the cake came out of the oven, the denser sections of candy had sunk quite deeply into the cake (more of a cosmetic issue than anything).
Assembly: J.N. cut the cooled cake with a serrated knife, spread on the chilled cream, and added the top layer, which had been sliced into eight wedges.

Results: The source of the "bee sting" label is obvious, as the almond candy layer has a pronounced and very delicious honey flavor.This is quite a rich coffee cake and makes a great breakfast treat.
Acme's Rustic Baguettes // Maggie Glezer, Artisan Baking
First recipe from a new baking book seems like a good occasion to start taking serious notes. Unfortunately, between mixing the poolish and scrap dough and checking on available blog names, some mismeasurement occurred, and instead of firm French bread dough I have glop. So whatever I produce today will not be a faithful interpretation of Acme's Rustic Baguettes from Artisan Baking -- but will be exciting (to the baker) nonetheless.

--
Ingredients:
Flour: Trader Joe's AP Flour (note: TJ no longer sells KAF)
Yeast: SAF Gourmet (packet)
Water: Tap!
--
Mixing: This is the first recipe I've tried that has poolish AND pate fermentee elements that are prepared at the same time. The "scrap dough" ferments on the counter for three hours, and then is refrigerated; the poolish ferments for twelve. On the day of baking, the poolish is mixed with additional water, flour, and a small amount of yeast, allowed to stand, and then the salt and scrap dough are kneaded in.
First hurdle: after completing these steps, the dough is far too wet. Did I leave out a cup of flour? Overmeasure the water? Should I have kneaded the scrap dough more when preparing it the night before?
Attempt to save: adding additional flour and repeating the mixing steps, including a period of rest (autolyse).
--
Shaping and Baking: As sometimes happens, the dough firmed up a bit in the "turning" stage, which involves flattening the dough on a floured board and folding the dough into a neat package. (Stretch and fold, more or less.) It was no longer sagging apart at the shaping stage. As directed, I made two demi-baguettes and a boule.
I wet the bread slightly before baking but didn't steam the oven. One of the demi-baguettes took an artistic twisting dive onto the stone, but the other remained more or less straight. The cuts opened up and healed till barely visible.
Results:
Color: Slightly yellowish on the inside, dark brown on the outside.
Flavor: Standard French. I'm not tasting any particular nuances yet, so my favorite French bread remains the much easier version that Peter Reinhart is developing for his forthcoming book. But I'll try this one again.

--
Ingredients:
Flour: Trader Joe's AP Flour (note: TJ no longer sells KAF)
Yeast: SAF Gourmet (packet)
Water: Tap!
--
Mixing: This is the first recipe I've tried that has poolish AND pate fermentee elements that are prepared at the same time. The "scrap dough" ferments on the counter for three hours, and then is refrigerated; the poolish ferments for twelve. On the day of baking, the poolish is mixed with additional water, flour, and a small amount of yeast, allowed to stand, and then the salt and scrap dough are kneaded in.
First hurdle: after completing these steps, the dough is far too wet. Did I leave out a cup of flour? Overmeasure the water? Should I have kneaded the scrap dough more when preparing it the night before?
Attempt to save: adding additional flour and repeating the mixing steps, including a period of rest (autolyse).
--
Shaping and Baking: As sometimes happens, the dough firmed up a bit in the "turning" stage, which involves flattening the dough on a floured board and folding the dough into a neat package. (Stretch and fold, more or less.) It was no longer sagging apart at the shaping stage. As directed, I made two demi-baguettes and a boule.
I wet the bread slightly before baking but didn't steam the oven. One of the demi-baguettes took an artistic twisting dive onto the stone, but the other remained more or less straight. The cuts opened up and healed till barely visible.
Results:
Color: Slightly yellowish on the inside, dark brown on the outside.
Flavor: Standard French. I'm not tasting any particular nuances yet, so my favorite French bread remains the much easier version that Peter Reinhart is developing for his forthcoming book. But I'll try this one again.
Subscribe to:
Posts (Atom)