
I often throw together a sourdough bread that's loosely based on the King Arthur Flour recipe for Pain au levain (in The King Arthur Flour All-Purpose book). Sometimes I don't even measure -- I just put the larger portion of my fed starter into the bowl and add flour and water to consistency. I aim for a slightly tacky dough, as I've learned that the dough will firm up during stretch-and-fold operations.
Right now I'm making this bread with the following:
my starter, which was fed this morning with white-wheat flour (KAF)
half a cup of golden flax seeds
half a cup of Silver Palate's "thick and rough" oatmeal cereal
Trader Joe's "Baker Josef" AP flour
tap water
salt
Some hasty notes on what's in-progress here:
I start by adding water to the starter, which is about two cups' worth. Then I add the flax seeds and oatmeal as I'd like them to soak up some of the water (a better way, possibly, would be to soak the seeds and oatmeal overnight). After letting it all stand for a little, I mix in the flour and wait 20 minutes.
After twenty minutes, I mix in the salt. I've learned that the dough should taste slightly salty at this point: after rising, it won't.
Another twenty minutes, stretch and fold; twenty minutes, stretch and fold, then into the refrigerator. I've learned from Peter Reinhart that the cold fermentation can improve flavor -- and it's convenient, at least. I've learned from Maggie Glezer that you can do the stretch and fold step on the kneading board (sprinkle a little flour on the board and in the bowl, turn out, gently flatten into a rectangle, and fold, left, top, right, bottom: makes a package).
In the morning, I'll cut off some dough, shape it, and let it warm up for about an hour. My shaping skills aren't strong enough for a long proof: I depend on the extra expansion in the oven. I'll sprinkle the loaf with hot water, slash it (still working on those cuts from the side, rather than straight up and down), and bake. Results here tomorrow!
Monday, November 9, 2009
Sunday, October 25, 2009
Sourdough Ciabatta with Caramelized Onions & Herbs / adapted from Poolish Ciabatta // Peter Reinhart, The Bread Maker's Apprentice

I'd like to focus on ciabatta for a while. I have yet to achieve the "airy" quality deriving from big interior holes in this bread, and no doubt my handling of the dough is partly responsible. Luckily it's tasty even if not correct.
This bread was an adaptation of Peter Reinhart's poolish-method ciabatta, using my sourdough starter. I fed the starter and increased the hydration to something like a poolish consistency, and then I simply replaced the poolish quantity with the starter and omitted the commercial yeast. My starter had been fed with both a rye blend and bread flours from King Arthur.
All of the commentators on ciabatta agree: this dough has to be wet, as wet as you can make it. I used milk and water and gave it a go in the stand mixer, then took it through several stretch-and-folds on a bed of flour. I picked up the trick from another cookbook of doing this stage in a casserole dish (it holds the wet dough and the bed of flour pretty well). I gather from some breadmaking sources that you actually want to use a softer flour for ciabatta, but I have yet to test this out.
I also used the option in The Bread Maker's Apprentice of caramelizing some onions and adding some herbs (tarragon), which are all added to the dough during stretch-and-fold operations. The final rise is on floured cloth. The bread (which was definitely puffy -- perhaps it deflated in the transfer to the oven?) is baked on parchment, on a hot stone.
Seeded Pain au Levain // The King Arthur Flour Baker's Companion

Just ordinary pain au levain, rolled in an aromatic seed mix from King Arthur Flour.
Multigrain Extraordinare // Peter Reinhart, The Bread Maker's Apprentice

This recipe calls for a grain starter containing oatmeal, cornmeal, buckwheat. It also takes some cooked rice. In this picture you can see the center swirl that comes from rolling the loaf up out of a flattened rectangle. Cooked in a bread pan. It's a sweeter bread with some brown sugar.
Thursday, October 8, 2009
Crackerbreads // The King Arthur Flour Book
Lately I've taken a break from yeasted breads and tried the techniques of stone-baked flat breads. The following are "Many-Seeded Crackerbread" and "Carta di Musica," respectively.

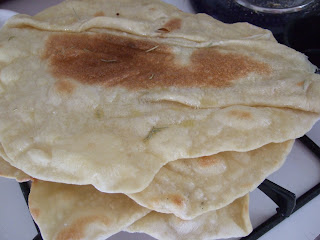

Both breads are baked on a hot stone. Here's the seeded bread:


The upper picture is of a crackerbread that's meant to have a lot of seeds in it -- I used the King Arthur bagel topping, which includes bits of onion.
The lower picture is of a crackerbread that's brushed with olive oil and sprinkled with rosemary after it's removed from the oven.
The fun thing about the Carta di Musica is that it contains semolina flour and can, after resting, be rolled out and handled/stretched like a thin crust pizza:

Both breads are baked on a hot stone. Here's the seeded bread:

On Deformed Baguettes
The authorities all say that shaping a good baguette (or even a demi-baguette) takes practice. Indeed, Maggie Glezer even suggests that the professionals can get rusty without practice. I usually content myself with whatever lumpy shape makes it onto the stone, but lately I've made a couple of more conscientious attempts at baguette. The following are the (revealing) results: breads that look like they've exploded out the side, or grown goiters.


The reason for the goiter, of course, is a failure to seal the bottom edge of the bread adequately. The shaping of loaves is supposed to create a taut, smooth surface or "skin" that can help to seal the bread. In shaping a baguette, the baker takes the bread through at least two letter-fold sequences (see Peter Reinhart, The Bread Maker's Apprentice, for pictures).
I've struggled with the sealing-the-edge technique, described as sealing the bread with the heel or the edge of your hand. My dough often seems reluctant to seal, whether due to overworking (should I let it rest, then come back and pinch it again?) or to picked-up flour from the board.
In the meantime, humorous results (this one was more of a batard anyway).

Thursday, September 24, 2009
In Brief: The Pearl's Walnut Levain // Maggie Glezer, Artisan Baking
This bread is quite similar to The Pearl's Pane coi santi, as it uses a similar French-style levain method to produce a sourdough bread. The proportions, however, are a little different. My walnut bread was a little more successful than my Pane coi santi.

This makes a good French toast (assuming a richer egg soak).

This makes a good French toast (assuming a richer egg soak).
Pane Siciliano // Peter Reinhart, The Bread Baker's Apprentice
Peter Reinhart's Pane Siciliano is a favorite of mine because of the texture imparted by the semolina flour. It also has (is intended to have) a nifty S-curve (but, as you can see, Mistakes Were Made). It utilizes a preferment that has to be made in advance (ideally, a day in advance, but in this case it just got some extra rise time).

Part 1: Pâté Fermentée
This baking round confirms my observation about the differences between bread books: whereas my flour measurements for Glezer's formulas have come up light (leading to dough wetter than described), my measurements for Reinhart's pate fermentee came up heavy (drier than described). Proof again, if you needed it, that weighing is more accurate than scooping. But I still don't own a reliable scale.
I'm trying to minimize the time that I work the dough, as Glezer says mixing too much will aerate the dough and bleach the flours, resulting in a loss of flavor. This means adding an autolyse stage to my bread mixing (letting the dough rest after it comes together and before turning/making smooth). I'm doing this part by feel.

The PF rose quite briskly, as it's been hot weather in Southern California. I'd almost be inclined to reduce the yeast in this and the main dough -- in the picture, it's barely at the halfway counter by the clock.
Part 2: Main Dough
Mixing/Fermentation. This dough contains equal parts bread and semolina flour, plus the PF and small amounts of honey and oil. I added the oil after the rest of the dough was mixed and relaxed, as I've heard oil can interfere with gluten formation (however, I doubt whether a couple of tablespoons is that significant -- this is more important for brioche, I gather). It took some time for the oil to absorb.
The first rise was quite robust, even though I cut the rising time short; when I went to shape the dough, I found it bounding out of the bowl (honeycombing).
I made three loaves -- one quite lovely, the others ugly ducklings. Purists will note that the skin is not nearly tight enough! Bread does not suit a hurried soul!

Proofing. This bread proofs in the fridge overnight. The loaves were nearly ready to go when I pulled them out this morning. However, in the process of loading the breads into the oven, I suffered a terrible Bread Disaster (tm) -- I somehow misaligned the baking sheet as it was going onto the rack, and the sheet flipped a quarter turn and wedged between the door and the shelves. (I'm still not sure exactly how this happened.) With tiny screams of anxiety I scooped each loaf up and plopped it back onto the sheet -- hoping that there was some air left in the mangled loaves. There was a visible dough print left on the oven door!
Results. The bread, as you can see, turned into a kind of lumpy superloaf where the three original loaves got squished together in the rescue operation. The places where each loaf hit the oven door are visible if you know where to look. The interior of each loaf is dense and spongy -- this really was a super-rising bread -- and, of course, completely irregular, due to the accident. But edible! (After snapping the "results" picture, I returned the bread to the oven for approximately 10 minutes.)
Sunday, September 13, 2009
The Pearl's Pane coi santi // Maggie Glezer, Artisan Baking

This bread is marked as Advanced in the Artisan Baking book, and the chief reason seems to be the difficulty of kneading in by hand a huge quantity of walnuts and raisins, not a few of which wanted to pop out and roll across the counter. This bread takes the full day to make, plus the preparation of the starter and levain the day before.

Ingredient Notes:
KAF All-Purpose
KAF White Wheat Flour
KAF Rye Blend Flour
Preparation: This recipe calls for levain, which is made the day before from a starter that has been refreshed within 8 hours. Here's my levain going down for the night:

The flours are mixed with water and left to autolyse. After adding the salt and levain and mixing with the dough hook, I had a very wet dough, not the firm dry dough called for in the recipe. This is the second recipe from this book that has turned out fairly wet, so I'm guessing there's a mismatch between the measuring cups I have and the book measurements. I don't have an accurate scale, so we'll be measuring more generously from now on.

A tablespoon of bread flour, plus additional flour during the hand-kneading stage, got it a bit firmer. After mixing in the walnuts and raisins (this took some rests for the dough to relax further), the dough went down for an hour, was turned, and back in the bowl for another 3-4 hours. Here it is before the rise:

After that, it was cut in two, shaped into batards (one shaped by rolling and pinching, the other in the traditional letter-fold way) and left to rest on a floured cloth (couche):

...for another 3 hours. The breads became puffy but not huge. (In the picture above, you can already see that the walnuts are staining the dough with dark swirls.)
The breads were then placed on parchment paper, shallowly cut, and slid onto a baking stone, 425 in my gas oven. And the result:

Results: With so many raisins and such a long rise, the bread can't help but taste sweet. The small quantities of rye and whole wheat definitely deepen the flavor and make it more complex. The bread is chewy.
I checked website for the Pearl Bakery (whose bread inspired Glezer's recipe), and note that their version of pane coi santi includes black pepper -- something to keep in mind for my next go at this bread.
Friday, September 11, 2009
In Progress: Sourdough Starter // Maggie Glezer
I'm currently refreshing my starter into the very firm, dough-like starter preferred by Maggie Glezer in Artisan Baking. Here's what it looks like as of this afternoon:


No, that's not a small underbaked biscuit -- this starter is very firm!
KAF Lemon-Almond Biscotti
We were running out of the Nonni's biscotti and I thought it might be time to try my hand again. However, the Old-Fashioned Biscotti recipe in The King Arthur Baker's Companion calls for three eggs, and we were down to two, so I pulled up this Lemon-Almond Biscotti recipe from the website. They've already blogged it on their Baker's Banter site (We break for biscotti, 30 Apr. 2008), so check out the page for step-by-step pictures (including a mister that looks a little like a blowtorch) and baker comments.

Ingredients:
Flour: KAF All-Purpose
Sugar: C&H Superfine
Almond extract: Beck's Secret Spoon Pure
Preparation: My own necessary adjustments to the recipe include using prepared dried lemon peel (1:1, according to the label) and (gasp) prepared lemon juice. I was also a little short on almond extract and couldn't go all the way up to the maximum amount, as I wanted to.
The recipe produces a soft dough very similar to unchilled cookie dough (which I guess this more or less is). Using parchment paper helps as you don't have to worry about the dough sticking to the sheet. The trickiest stage is coaxing the dough into a flattened "log" of the right length and thickness. I found that wetting the spatula repeatedly helped the most (good and wet, not just damp). What you end up with will look squarish and cook out into a rounded hump similar to the Baker's Banter picture, so you will have those nice round edges that you've seen on all commercial biscotti.
After taking the biscotti out of the oven after the first bake, I left them to cool for about an hour. I found it unnecessary to mist the log as the recipe suggests -- just go slowly with the serrated knife and, if the dough is cool enough to hold together, you won't have more than a few crumbles. I sliced at a slight diagonal to get longer slices.
The final stage is the "toasting" stage, which dries out the cookies and produces a nice brown edge. You can adjust the second bake according to the thickness of the slices and the desired amount of browning.
Results: After initial cooling, the cookies seem quite dry and crisp. I imagine that they will soften slightly over time, producing the "light and crunchy" cookies that the Banter page describes as "made for eating out of hand."
Monday, August 24, 2009
Bee Sting Cake (w/ J.N.) // Nick Malgieri, Perfect Cakes
A brioche-cake base with cream filling and a candied almond topping. J.N.'s been wanting to make this for a while, but the brioche, as a yeasted product, made him nervous (past yeasts have failed him). We collaborated and produced a rich dessert.

Ingredients:
Sage blossom honey
T.J.'s AP Flour
Superfine sugar
Preparation: We started by making the sweet brioche, which is pressed into the bottom of the springform and pricked with a fork. Then we made the almond candy topping, which cools briefly before being added to the risen cake and baked, and the cream filling, which must chill in the fridge. Each step is relatively simple, but as there are three components, it is a time-consuming process.
We found that the candy layer had become quite stiff by the time we needed to spread it on the cake -- it was almost stiff enough to roll out, but we coaxed and poked it. Probably the candy wasn't supposed to be this hard; we heated it at such a low temperature that it didn't want to boil for a long time. When the cake came out of the oven, the denser sections of candy had sunk quite deeply into the cake (more of a cosmetic issue than anything).
Assembly: J.N. cut the cooled cake with a serrated knife, spread on the chilled cream, and added the top layer, which had been sliced into eight wedges.

Results: The source of the "bee sting" label is obvious, as the almond candy layer has a pronounced and very delicious honey flavor.This is quite a rich coffee cake and makes a great breakfast treat.
Acme's Rustic Baguettes // Maggie Glezer, Artisan Baking
First recipe from a new baking book seems like a good occasion to start taking serious notes. Unfortunately, between mixing the poolish and scrap dough and checking on available blog names, some mismeasurement occurred, and instead of firm French bread dough I have glop. So whatever I produce today will not be a faithful interpretation of Acme's Rustic Baguettes from Artisan Baking -- but will be exciting (to the baker) nonetheless.

--
Ingredients:
Flour: Trader Joe's AP Flour (note: TJ no longer sells KAF)
Yeast: SAF Gourmet (packet)
Water: Tap!
--
Mixing: This is the first recipe I've tried that has poolish AND pate fermentee elements that are prepared at the same time. The "scrap dough" ferments on the counter for three hours, and then is refrigerated; the poolish ferments for twelve. On the day of baking, the poolish is mixed with additional water, flour, and a small amount of yeast, allowed to stand, and then the salt and scrap dough are kneaded in.
First hurdle: after completing these steps, the dough is far too wet. Did I leave out a cup of flour? Overmeasure the water? Should I have kneaded the scrap dough more when preparing it the night before?
Attempt to save: adding additional flour and repeating the mixing steps, including a period of rest (autolyse).
--
Shaping and Baking: As sometimes happens, the dough firmed up a bit in the "turning" stage, which involves flattening the dough on a floured board and folding the dough into a neat package. (Stretch and fold, more or less.) It was no longer sagging apart at the shaping stage. As directed, I made two demi-baguettes and a boule.
I wet the bread slightly before baking but didn't steam the oven. One of the demi-baguettes took an artistic twisting dive onto the stone, but the other remained more or less straight. The cuts opened up and healed till barely visible.
Results:
Color: Slightly yellowish on the inside, dark brown on the outside.
Flavor: Standard French. I'm not tasting any particular nuances yet, so my favorite French bread remains the much easier version that Peter Reinhart is developing for his forthcoming book. But I'll try this one again.

--
Ingredients:
Flour: Trader Joe's AP Flour (note: TJ no longer sells KAF)
Yeast: SAF Gourmet (packet)
Water: Tap!
--
Mixing: This is the first recipe I've tried that has poolish AND pate fermentee elements that are prepared at the same time. The "scrap dough" ferments on the counter for three hours, and then is refrigerated; the poolish ferments for twelve. On the day of baking, the poolish is mixed with additional water, flour, and a small amount of yeast, allowed to stand, and then the salt and scrap dough are kneaded in.
First hurdle: after completing these steps, the dough is far too wet. Did I leave out a cup of flour? Overmeasure the water? Should I have kneaded the scrap dough more when preparing it the night before?
Attempt to save: adding additional flour and repeating the mixing steps, including a period of rest (autolyse).
--
Shaping and Baking: As sometimes happens, the dough firmed up a bit in the "turning" stage, which involves flattening the dough on a floured board and folding the dough into a neat package. (Stretch and fold, more or less.) It was no longer sagging apart at the shaping stage. As directed, I made two demi-baguettes and a boule.
I wet the bread slightly before baking but didn't steam the oven. One of the demi-baguettes took an artistic twisting dive onto the stone, but the other remained more or less straight. The cuts opened up and healed till barely visible.
Results:
Color: Slightly yellowish on the inside, dark brown on the outside.
Flavor: Standard French. I'm not tasting any particular nuances yet, so my favorite French bread remains the much easier version that Peter Reinhart is developing for his forthcoming book. But I'll try this one again.
Subscribe to:
Comments (Atom)